Managing Zoom Meetings
Columbia College Chicago has made Zoom Pro accounts available to all faculty, staff, and students.
Zoom is a video communications tool that allows you to host video conference calls with your students, fellow staff members, and classmates. Features such as screen sharing, white boards, polling, chat, and captioning make Zoom a robust choice for remote communication, collaboration, and online lecture delivery.
Tips for Using Zoom for Students
Before your Zoom meeting:
- Have your video on unless you are experiencing connection issues.
- Find a quiet space without interruptions and background noise.
- Have a plain background. Avoid backlight from bright windows.
- Have good lighting on your face so you can be seen clearly.
- Adjust your camera to be at around eye level if possible – especially take note of the angle of your laptop screen if using the built-in camera.
- Dress as if you are attending to your class. Avoid bright colors that may be distracting.
- Contact your faculty if you are unable to attend the meeting before the class time.
Source: Zoom
During meeting:
- Mute your microphone when not talking.
- Try to avoid talking over or at the same time as other participants.
- Raise your hand to get attention.
- Be aware that you are on camera and try to avoid doing other tasks, checking emails, looking at your phone etc.
- Respect each other’s comments. If you disagree, please use critical thinking, and engage in supportive discussions.
- Feel free to wave your hands to get attention if your faculty didn’t see you.
Source: Peter Cook, Chair of the American Sign Language department.
After meeting:
- Review any concepts that you did not understand and contact your faculty or tutor for clarification if needed.
- Reach your classmates for peer interactions through separate Zoom meetings.
- If a class was recorded, check the Zoom meeting record of the presentation for reviewing and watching.
- For instructions on how to get to a cloud recording from a Canvas course, students may refer to this help guide.
Source: Peter Cook, Chair of the American Sign Language department.
Tips for Using Zoom With Bandwidth Issues or a Poor Connection
If you are participating in a Zoom meeting and are having issues with network connectivity, the following steps will assist in allowing you to still participate in the session.
- Turn your video off. This will help free up bandwidth on your connection, and will still allow you to engage in conversation with those on the call until your connection improves.
- Close any unneeded browsing windows and applications that are open on your device.
- Avoid screen sharing multi-media content, such as videos. As an alternative, deliver these resources to participants so that they may view prior to your meeting outside of Zoom.
- If needed, you may dial into your meeting from a telephone if a poor connection is affecting your audio. From your telephone call, you can listen to and engage with other participants. Each meeting invitation includes a call-in number that you may dial to join a Zoom call by telephone. Once you dial this number, you will be prompted to enter the meeting's ID, which is also found in the meeting invite.
Accessing Cloud Recordings
As a reminder, for students to view cloud recordings of Zoom meetings, they must first be signed into a Columbia Issued Zoom account. Students may sign into their Columbia issued Zoom accounts at https://colum.zoom.us with their MyColumbiaID@colum.edu username and Office 365 password. These are the same credentials used to access their student email accounts through Office 365.
For instructions on how to get to a cloud recording from a Canvas course, students may refer to this help guide.
For login support, they may also visit our student support site.
If you have any questions, please contact Academic Technology at canvaslms@colum.edu.
Hosting Accessible Meetings on Zoom
Live Captioning: Zoom has an automatic live captioning feature available so that participants can view closed captions in real time. When enabled by a meeting host, participants can opt into viewing the automatic captions. A host can also assign a participant to manually enter closed captions for the meeting live in real time.
Multi-Pin and Spotlight Features: Hosts can allow participants to pin multiple attendees within a meeting at once. This allows for a participant to view a speaker and interpreter simultaneously. Meetings hosts can also spotlight a speaker and interpreter to adjust the view of all attendees.
Muting Participants Upon Entry and Muting Yourself: Background noise can impair the accuracy of automatic closed captioning and the use of screen readers. As a host, mute participants upon entry to your meetings. As a participant, mute yourself when you are not speaking.
Identify Yourself: When you attend meetings with anyone that is hearing or visually impaired, identify yourself before speaking. This allows those who rely on captions, interpreters, or only audio to be aware of who is speaking at a given point in time. Meeting hosts should encourage this of their participants.
Virtual Backgrounds: Avoid using a virtual background that contains motion or flashing images. These backgrounds can adversely impact those with epilepsy, migraines, or motion sickness. It is best to use a static image or the blurred background feature when using a virtual background.
To take advantage of accessibility features in Zoom, make sure that your Zoom application is up to date. To ensure that you have the most up to date version of the Zoom application, review this instructional guide from Academic Technology.
Automatic Live Transcription
A live transcription feature is now available for use on Columbia College’s Zoom account. This feature will allow a meeting host to generate automatic live captions during a Zoom meeting or webinar for participants to view. This feature may also be used to generate and save a copy of a live transcript created from your Zoom meeting.
A “Live Transcript” button will appear in your meeting controls when you host a meeting or attend one that is using this feature.
For instructions on how to use the live transcription feature, please refer to these instructions created by Academic Technology.
It is also recommended to make sure that your Zoom application is up to date to best support new features.
Zoom Meeting Controls
The following options are available within Zoom to assist you in managing your meeting attendees and settings appropriately.
Zoom Meeting Settings
Setting Up Meetings Through Canvas
Personal Meeting ID
Requiring Password
Enable Waiting Room
Mute Participants Upon Entry
Turn Video Off Upon Entry
Turn Off File Transfers
Prevent Removed Attendees from Rejoining
Managing Users in a Zoom Meeting
Remove an Attendee From the Meeting
Mute a Participant
Mute All Participants
Stop Video for a Participant
Control Screen Sharing
Manage Whiteboard Access
Lock a Meeting
Meeting Security Option
Zoom Meeting Settings
Setting Up Meetings Through Canvas
If you are an instructor creating a Zoom meeting for a class session, it is recommended to schedule the meeting through your Canvas class. Zoom is fully integrated and available within every Canvas course. When meetings are scheduled for a class from within Canvas, it keeps the meetings accessible from within Canvas and does not require an instructor to send out meeting links through email. This keeps the meetings accessible from within Canvas, and limits the opportunity for meeting links to be shared with outside users.
To schedule a Zoom meeting within a Canvas course, instructors may view this instructional guide from Academic Technology.
Personal Meeting ID
Every Zoom user has a personal meeting ID that can be used to schedule and join meetings. When setting up a meeting in Zoom, it is recommended to never schedule meetings using your personal meeting ID. Creating meetings with different ID numbers will prevent unwanted attendees from joining your Zoom meetings.
When you set up your meetings, choose the option for Zoom to generate a meeting ID automatically.
![]()
Requiring Password
When scheduling a Zoom meeting, you will have an option to password protect your Zoom meeting. This will require participants to enter a password to join your meeting.
![]()
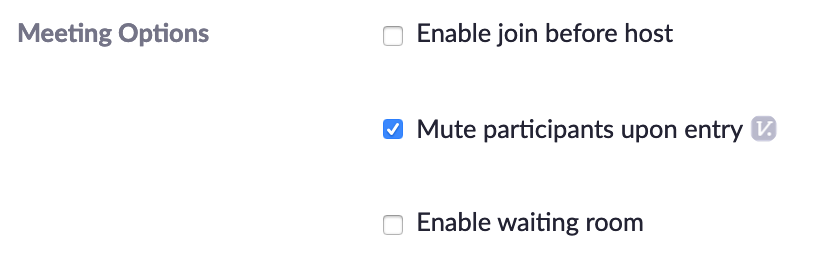
Enable Waiting Room
If you enable the waiting room feature when scheduling a meeting, participants will not be able to join your meeting until you admit them to the meeting as the meeting host. This option is available in the meeting option section when scheduling a Zoom meeting.
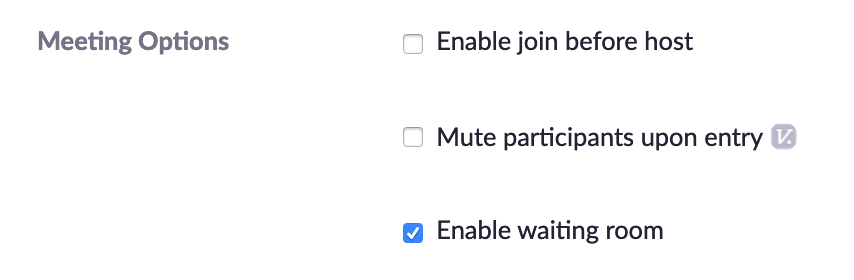
Mute Participants Upon Entry
You may mute participants upon their entry to your Zoom meeting. This option is available in the meeting option section when scheduling a Zoom meeting. Participants will be able to enable their microphone after joining the call. You can mute specific participants, or all participants throughout your meeting.
Turn Video Off Upon Entry
You may keep participant's webcam videos turned off upon entry to your Zoom meeting. Participants will be able to turn on their webcam after joining the call. You can stop video for specific participants throughout your meeting.

Turn Off File Transfers
Prevent attendees from transferring files during the meeting by signing in to https://colum.zoom.us. Go to the settings section and make sure that the file transfers option is turned off.

Prevent Removed Attendees from Rejoining
As a meeting host, you may remove participants from a meeting. To ensure that removed participants cannot rejoin a meeting, signing in to Zoom https://colum.zoom.us and go to the settings section. Make sure that removed participants are not allowed to rejoin.

Managing Users in a Zoom Meeting
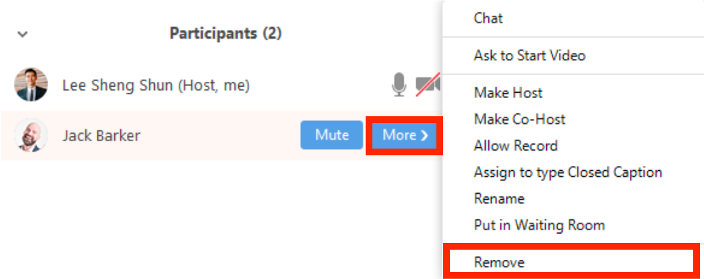
Remove an Attendee From the Meeting
To remove attendees from a Zoom meeting, click on "Manage Participants."

Click "More" next to the participant that you would like to remove, followed by "Remove."
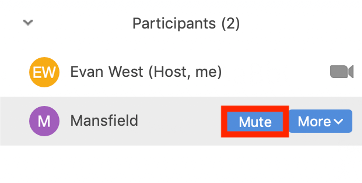
Mute a Participant
To mute a meeting a participant, click on "Manage Participants."
Click "Mute" next to the participant that you would like to mute.
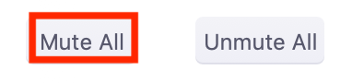
Mute All Participants
To mute all meeting a participants, click on "Manage Participants."
Select "Mute all."
Stop Video for a Participant
To stop video for a meeting participant, click on "Manage Participants."
Select "More."
![]()
Click on “More” next to the participant you would like to stop video for and select "Stop Video."

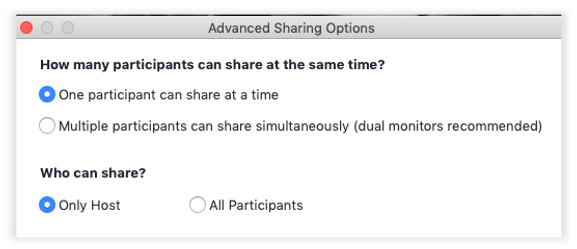
Control Screen Sharing
You can control who can share their screen in a meeting. Click on the arrow next to the “Share Screen” option.
![]()
Choose who can share their screen or if multiple participants can share their screen at the same time.
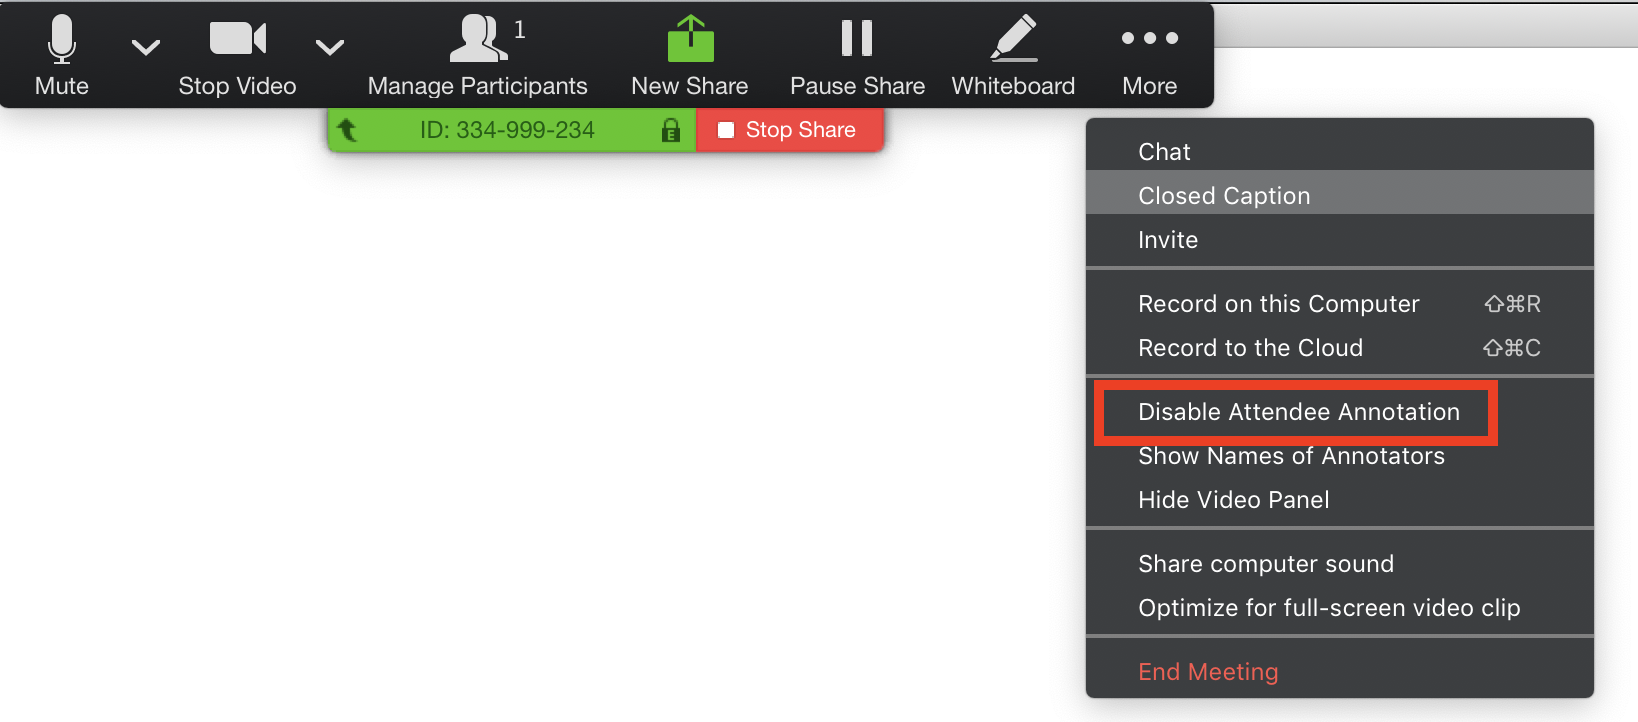
Manage Whiteboard Access
To prevent attendees from annotating a shared whiteboard during a meeting, click on "More" when sharing a whiteboard, followed by "disable attendee annotation."
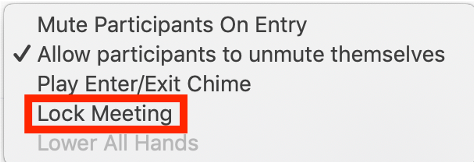
Lock a Meeting
You can lock your Zoom meeting to prevent any new participants from joining your meeting.
To lock a meeting, click on "Manage Participants."
Select "More."
![]()
Choose the "Lock Meeting" option.
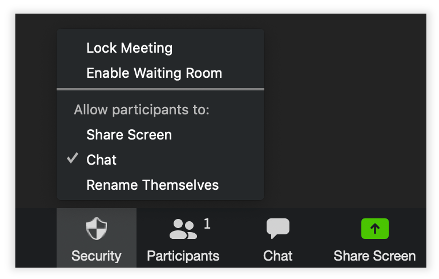
Meeting Security Option
In newer versions of Zoom after 4.6.10, as a meeting host you are able to adjust security settings right within a meeting. Click “security” to lock a meeting or enable the waiting room. You may also decide if participants are able to share their screen, chat, or rename themselves within this area as well. If you do not see this option in your meeting, visit the Zoom download center to update your Zoom client.
Zoom Help Guides and Resources
- Zoom Cheat Sheet
- How do I schedule Zoom Meetings?
- How do I schedule Zoom Meetings in Canvas?
- How do students join Zoom Meetings scheduled in Canvas?
- How do I share my screen within a Zoom Meeting?
- Use these instructions to share presentations and documents
- Use these instructions to share presentations and documents
- How do I use the Whiteboard feature in a meeting?
- How do I record my meetings?
- How do students access cloud recordings?
- How do I save my recordings to OneDrive?
- How do I manage meeting settings and attendees?
- How do I access my Columbia College Zoom account if I previously had a basic Zoom account?
- How do I switch accounts in the Zoom client?
- Host and co-host controls
- Live Automatic Transcription
- Closed captioning Zoom meetings
- American Sign Language Interpretation in Zoom
- Accessibility Settings in the Zoom App
- Managing Breakout Rooms
- How do I Create a Poll Within a Meeting?
- Download the latest version of Zoom
- How do I spotlight a participant?
- How do I use the multi-pin feature?
- How do I use a mobile device as a second camera?
- Changing your video layout during a meeting
- Setting a custom gallery view order
- Using a virtual background
- How do I add my pronouns in Zoom?
- Using the Microsoft Outlook Plugin for Zoom
- Reserving a Zoom Webinar license in EMS
- Live streaming a Zoom meeting to YouTube
- Live streaming a Zoom meeting to Facebook Live
- Live streaming a Zoom meeting using a custom streaming service
- Preventing Teams Meetings from Auto-Populating to Calendar Invites
Zoom for Personal Use
Like all assets that the college provides to faculty, the Zoom account is intended to support faculty in their contractual responsibilities regarding their own job descriptions as they relate to creative and scholarly work, teaching, and service.
Zoom and FERPA Compliance
Zoom is committed to protecting the security and privacy of their customer’s data. To help with FERPA compliance, Zoom offers advanced encryption to protect system data. Zoom also offers effective in-meeting security settings. To learn more about Zoom and FERPA compliance, you may view Zoom’s statement on FERPA.
Academic Technology has also implemented additional Zoom features to provide added protection to meetings and meeting recordings. Academic Technology also actively provides documentation and training for new meeting security features, and security updates from Zoom.
Recording of Online Sessions
Recording of all Columbia College Chicago courses is governed by Illinois law. The State of Illinois requires the consent of both parties for the recording of any conversation. Therefore, instructors should announce their intention to record any class discussions for the benefit of students participating remotely and give students the opportunity to contact them with questions or concerns. The instructor's announcement may be for an individual class session or included as a policy in the syllabus. Similarly, students should only record class sessions with the consent of the instructor.
For more information about how student privacy relates to video conferencing and recorded class sessions, refer to this resource from the University of Michigan.
Zoom Bombing Prevention
It is important to maintain best practices when setting up your meeting to allow for a seamless video conferencing experience and to prevent unwanted guests from accessing your meeting, also known as Zoom bombing. Academic Technology has created a tutorial video on Zoom bombing prevention.
If you experience an incident of Zoom bombing, fill out this form in Team Dynamix to notify the college and receive assistance from Academic Technology.
It is strongly recommended to not share meeting links and invitations publicly or post them to any public site. This is to prevent uninvited users from accessing your Zoom meeting.